Showing posts with label ♥DIY. Show all posts

19 October 2013

It's Fall/Halloween Time!!

Print Friendly and PDFPrint Friendly


Get Your Feast On!

22 July 2013

DIY: Easy Armpit Stain Remover

Print Friendly and PDFPrint Friendly

I've tried many DIY concoctions to remove those pesky armpit stains and a lot of them do work, BUT a lot of them are also so potent to the point where they fade even the color of the shirt. For whites, obviously it's perfectly okay but for colored, the faded area, in my opinion, looks just as bad as the stain itself.

I recently came across this version of the mixture that I'd never heard of before and decided to give it a go.

Check out the results!


DIY: Armpit Stain Remover


What You'll Need:
  • 2 tablespoons Hydrogen Peroxide
  • 1 tablespoon liquid dish soap (OR laundry detergent specially for colored clothing)
  • Optional: baking soda
  • old toothbrush (obviously not the same one you use for your teeth hehe)
Directions:
-Mix all the ingredients together until it becomes bubbly.
-Soak armpit area with solution.
-Scrub are using toothbrush.
-Let sit for about an hour.
-Wash in the laundry as you normally would. 


Before (white)


Before (color)


 After (white)


After (color)


Verdict. I used laundry detergent instead of the dish soap, which the original recipe calls for, and as you can see the results are pretty awesome. I was so sick of having to throw away old shirts because of those nasty looking stains.


 Hope this works for you too!
Get Your Feast On!

11 December 2012

DIY: Holiday/Seasonal Coasters

Print Friendly and PDFPrint Friendly

My adorable mom who has taken the reigns for a VERY festive holiday season in the house gave me the greatest DIY idea.  Instead of throwing away those old coasters, re-vamp them! I chose to do a snowflake design because it'll not only fit the holiday spirit, but can be used the entire winter season.

I never realized what a big difference something so small like a coaster can do to your home. These coasters put a smile on my face every time I look at them or set my drink down :)


What You'll Need:
  • an old coaster
  • red acrylic paint
  • paint brush
  • white blank paper (or scratch)
  • scissors
  • Triple Thick Glaze
  • glitter nail polish (optional)

Directions
  1. Wash and dry surface of coaster you'll be painting on.
  2. Brush on two coats of red acrylic paint (allow to dry before each coat)
  3. Create snowflake using paper and scissors. For an easy tutorial, click here.
  4. Make sure snowflake is completely flat. Place it between heavy books for an hour to make sure.
  5. Brush a little bit of Triple Thick Glaze on back of snowflake and carefully glue it onto top of coaster. Make sure there's no air pockets. Let dry.
  6. Using glitter nail polish, evenly paint over snowflake. Let dry.
  7. Finish off with Triple Thick Glaze. Air dry for several hours.


 It's hard to tell in this picture, but the glitter polish I used had a silver shimmery base with some blue larger glitters mixed in. In person, the silver looks so beautiful and perfect for a snowflake design.


Hope you are all having a wonderful holiday season so far! 

Get Your Feast On!


26 October 2012

DIY: Pop Can Cookie Cutters

Print Friendly and PDFPrint Friendly

Have you ever gone out of your way to the baking section of the grocery store, the craft store, or even the dollar store only to find that none of these establishments carry the kind of cookie cutter you want? Or simply have you ever just wanted to create some fun and random cookies?

Well worry no more. Here's an easy way to make your own customized cookie cutters out of old pop/soda cans! I decided to go for a Halloween theme this time around :)

For an easy sugar cookie recipe, click here!


Recycled Pop Can Cookie Cutter - Halloween
 Ghost & Pumpkin (Jack O' Lantern)


What you'll need:
  • empty soda can washed 
  • paper and pencil/marker
  • sharp scissors
  • scotch tape (any durable tape works fine)

Directions
  1. On a piece of paper, sketch out desired shape and size.

  2. Squeeze center of soda can, then cut slit on folded edge (like how you'd cut a hole on center of paper). Through the hole you've created, continue cutting circumference of can until you've cut out bottom of can completely. Cut into thin strips.

  3. Mold strips.The aluminum is very flexible

  4. Once you've gotten roughly the shape you like. Tape together. Be sure to tape on both sides of the strips for more durability.


These are obviously going to be a little bit more flimsy than a store-bought proper cookie cutter, so be more careful when cutting out cookies :)

Re-usable. Handwash.


Get Your Feast On!

16 October 2012

DIY: Customized Mug

Print Friendly and PDFPrint Friendly
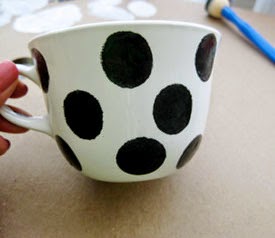
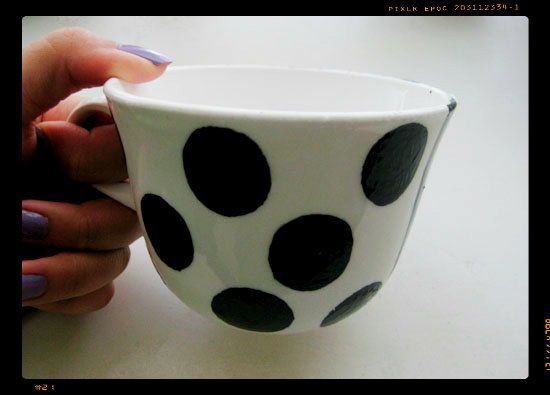
polka dots everywhere!


This was so much fun to do and surprisingly pretty easy! I think this is perfect to give as a gift or to do with the kids. Heck, I just did it for my own pleasure. Who wouldn't want to enjoy a nice cup of hot tea/coffee/chocolate during the colder months? And if they/you don't plan on drinking from it, these make awesome decorative pieces. Plus, the fact that it's homemade makes it extra special :)

I hope you enjoy!


What You'll Need
  • a plain white ceramic or glass mug (I got a pack of 7 from the thrift store for only $3!)
  • acrylic enamel or acrylic gloss paints (Gloss 95¢ Enamel $2 @Walmart. Enamel is preferred, but gloss is cheaper and works fine)
  • Triple Thick Gloss Glaze ($3.99 @ Hobby Lobby)
  • pencil
  • paint brushes (general arts paint brush set $4.99 @ Walmart)
  • newspaper or something to protect work surface
  • painter's palette (plastic) or styrofoam plate for mixing paints 
  • water
     Preparation 
    Set up workstation
    1. Cover work area with newspaper or I used flattened cardboard.
    2. Prep mugs by washing them with soap and water. Air dry. Wipe with alcohol to further eliminate residual oils. This will allow paint to really stick onto the mug and also make for a smooth surface.
    3. Prepare a medium sized bowl or cup filled with water and a separate paper towel to keep brushes from getting stiff and paints moist on the palette. 


    Step 1 - Paint It Black 


     Paint half of the mug with black acrylic enamel or gloss paint. 
    Note. Since I'm doing a very simple design for this post, I'm painting straight on, but if you're planning on doing something more elaborate like flowers or animals, etc. I'd recommend drawing it on first with a pencil to help you out.


    Should look like this after you're done. Your line will probably be straighter hehe. Allow to dry just enough, so it doesn't transfer by touch.


    Step 2 - Polka Dots!
     
      Using a round foam brush, carefully press on polka dots (white on black/black on white). If they come out sloppy at first, you can touch them up with a separate pencil brush.


    Step 3 - Air Dry
    Let the mugs air dry for at least a few hours.


    (Alternatively, you can force dry the paint by baking. Follow baking instructions on acrylic enamel paint bottle. Instructions may vary depending on brand)


     Step 4 - Glaze


    Brush on Triple Thick Gloss Glaze using one stroke technique.

      (One stroke from up to down over painted surface. Don't keep going back and forth over one area as you would with paint.) This glaze works best if you don't fuss around with it too much.

    This step is so important. It will not only give your mugs that glossy, fired look, but will also protect the mug and keep the paint lasting longer.>


    Special Notes 

    DISHWASHER SAFE   top rack only  (From experience, handwashing is preferred)

    DO NOT MICROWAVE  


    Get Your Feast On!


    23 December 2011

    DIY Cookie Gift Idea (super minimal, but sweet)

    Print Friendly and PDFPrint Friendly

    I forgot to post pictures of the final gift idea product in my last post, so I decided to take this opportunity and make a DIY type post.


     What you'll need:
    • cellophane bags (Dollar Store)
    • ribbon (super cheap at Walmart or craft store)
    • Packet of hot coco mix--whatever brand is on sale (they're all delicious to me!)

    I was originally inspired to use a Chinese take out container that you can also get at the Dollar Store instead, but I figured these bags would be easier to carry around. They didn't have any Christmas designs left, so I went with butterflies lol. It was either that or monster cars. The pack of cellophane bags came with twisty ties, but I think the ribbon is a little more festive looking. Either way is adorable.

    Again, this is very simple, very festive, stress-free. It's perfect to give as a gift to co-workers or to prepare as party favors at a cookie exchange/holiday party. All the ingredients to make the cookies were already in my pantry except the frosting and I always have packs of hot coco mix during this time of year. You can add more or less cookies if you desire and to really tie things together, you can include a mug. Mugs can get expensive though especially in bulk, so I didn't do that.

    Overall considering I didn't have much time to do this, I'm happy with the outcome...I know I'd be happy to receive this, that's for sure! :)


    Feast On!
    Andrea
    Related Posts Plugin for WordPress, Blogger...